Submitting a Reimbursement Request on the Mobile App
This article applies to you if you have a Via Benefits reimbursement account (sometimes known as a Health Reimbursement Arrangement)*. Participants receiving ICHRA benefits, please visit the ICHRA QuickStart Reimbursement page.
To submit a reimbursement request on the Via Benefits Accounts mobile app, complete these steps:
1. Sign in to the mobile app.
You can download the Via Benefits Accounts mobile app from the App Store or Google Play.
2. Select Add New Expense on the Dashboard.
Premium Expense
Your former employer or benefits provider may provide premium reimbursement only. You will only see the options offered to you by your former employer. Your selection options adjust per your current account setup.
To enter a premium expense, complete the following steps:
1. Provide information about your expense.
Select the category (e.g., Medicare, Part A/B, Medical, Pharmacy).
Select Premium for the type of expense.
Note: Group coverage premiums must be post-tax to be eligible for reimbursement.
Select Done.
Select Continue.
2. Enter the expense details.
Policy Period
Enter the Policy Period for a premium expense. Provide the coverage dates (e.g., January 2026 to December 2026).
Premium Amount
Select the amount type (Monthly or Total).
Enter the amount.
Carrier (e.g., Aetna).
Individual Serviced/Dependent (select yourself or a dependent from the drop-down list).
Select Continue.
You'll get immediate feedback on how much will be reimbursed based on your current balance and when to expense payments for ongoing premiums. Review and select Continue.
Examples
Past Month's Total Amount
Future Month’s Monthly Amount
3. The Payment Method displays the bank account on file. If you don't have a bank account on file, select Add Bank Account.
You may receive a check by mail if your former employer allows it. Please confirm your mailing address. Allow up to 10 days to deliver your check.
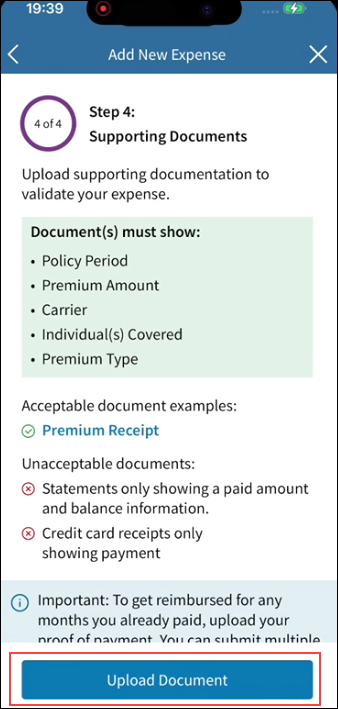
4. Select Upload Document (camera, files, photos) to upload your supporting documents. Document requirements and acceptable document examples are shown onscreen.
5. Review your request and select Submit.
Note: Select Edit to make changes.
6. You'll receive a success message after submitting your request.
Note: You can choose to Add Another Expense or go Back to Dashboard.
Allow up to five business days for your request to process.
Reimbursement delivery times:
Direct deposit: two to three business days
Check: 7 to 10 business days
Out-of-Pocket Expense
Your former employer or benefits provider may provide premium reimbursement only. You will only see the options offered to you by your former employer. Your selection options adjust per your current account setup.
To enter an out-of-pocket expense, complete the following steps:
1. Provide information about your expense.
Select the category (e.g., Dental, Hearing, Medical.)
Select the type (e.g., Treatment, Therapy, Equipment.)
Select Continue.
2. Enter the expense details:
Date(s) of Service
Amount
Provider (e.g., Dr. Smith, CVS)
Note: If you entered providers in the past, the field auto-populates with suggestions when you begin typing. However, you can enter any other provider in the blank field.
Individual(s) Serviced (select yourself or a dependent from the drop-down list)
Select Continue.
Note: A warning message will occur if the system detects a duplicate submission. You may continue with the request or cancel it.
3. The Payment Method displays the bank account on file. If you don't have a bank account on file, select Add Bank Account.
You may receive a check by mail if your former employer allows it. Please confirm your mailing address. Allow up to 10 days to deliver your check.
4. Select Upload Document (camera, files, photos) to upload your supporting documents. Document requirements and acceptable document examples are shown onscreen.
5. Select Review.
6. Select Submit after reviewing your request.
7. A success message appears on the Finished page when completed.
Select Add Another Expense if you want to submit another expense.
Select Back to Dashboard to return to the Home page.
Allow up to five business days for your request to process.
Reimbursement delivery times:
Direct deposit: two to three business days
Check: 7 to 10 business days
*Via Benefits reimbursement accounts are administered by Extend Health, LLC.

